Pages

Showing posts with label Android-OpenCV. Show all posts

2012/08/15

How to do real time image processing in Android using OpenCV?

This article teaches how to pass camera preview frame to android-opencv on the fly.

The Android camera have preview data callback function. I can get the data from the function convert to the OpenCV Mat data form.Using Android JNI IF pass the frame data to the OpenCV, let the image processing do in the native OpenCV library.

Step1:I need a camera preview class to handle the Android camera device.The class i created from the article How to use camera in Android?.In the article shows the way to take picture and save to the file.But in this article i only need the frame data in the camera preview period.
In the new CameraPreview.java file, i removed unused callback functions. Leave the only callback function onPreviewFrame(), and create a native function interface.
And create a Runnable() object to do the image processing.

/*
*  CameraPreview.java
*/
public class CameraPreview implements SurfaceHolder.Callback, Camera.PreviewCallback
{
  private Camera mCamera = null;
  private ImageView MyCameraPreview = null;
  private Bitmap bitmap = null;
  private int[] pixels = null;
  private byte[] FrameData = null;
  private int imageFormat;
  private int PreviewSizeWidth;
  private int PreviewSizeHeight;
  private boolean bProcessing = false;
 
  Handler mHandler = new Handler(Looper.getMainLooper());
  
  public CameraPreview(int PreviewlayoutWidth, int PreviewlayoutHeight,
     ImageView CameraPreview)
  {
    PreviewSizeWidth = PreviewlayoutWidth;
    PreviewSizeHeight = PreviewlayoutHeight;
    MyCameraPreview = CameraPreview;
    bitmap = Bitmap.createBitmap(PreviewSizeWidth, PreviewSizeHeight, Bitmap.Config.ARGB_8888);
    pixels = new int[PreviewSizeWidth * PreviewSizeHeight];
  }

  @Override
  public void onPreviewFrame(byte[] arg0, Camera arg1) 
  {
    // At preview mode, the frame data will push to here.
    if (imageFormat == ImageFormat.NV21)
    {
      //We only accept the NV21(YUV420) format.
      if ( !bProcessing )
      {
        FrameData = arg0;
        mHandler.post(DoImageProcessing);
      }
    }
  }
 
  public void onPause()
  {
    mCamera.stopPreview();
  }

  @Override
  public void surfaceChanged(SurfaceHolder arg0, int arg1, int arg2, int arg3) 
  {
    Parameters parameters;
  
    parameters = mCamera.getParameters();
    // Set the camera preview size
    parameters.setPreviewSize(PreviewSizeWidth, PreviewSizeHeight);
  
    imageFormat = parameters.getPreviewFormat();
  
    mCamera.setParameters(parameters);
  
    mCamera.startPreview();
  }

  @Override
  public void surfaceCreated(SurfaceHolder arg0) 
  {
    mCamera = Camera.open();
    try
    {
      // If did not set the SurfaceHolder, the preview area will be black.
      mCamera.setPreviewDisplay(arg0);
      mCamera.setPreviewCallback(this);
    } 
    catch (IOException e)
    {
      mCamera.release();
      mCamera = null;
    }
  }

  @Override
  public void surfaceDestroyed(SurfaceHolder arg0) 
  {
     mCamera.setPreviewCallback(null);
  mCamera.stopPreview();
  mCamera.release();
  mCamera = null;
  }

  //
  // Native JNI 
  //
  public native boolean ImageProcessing(int width, int height, 
      byte[] NV21FrameData, int [] pixels);
  static 
  {
     System.loadLibrary("ImageProcessing");
  }
    
  private Runnable DoImageProcessing = new Runnable() 
  {
    public void run() 
    {
      Log.i("MyRealTimeImageProcessing", "DoImageProcessing():");
      bProcessing = true;
      ImageProcessing(PreviewSizeWidth, PreviewSizeHeight, FrameData, pixels);
      
      bitmap.setPixels(pixels, 0, PreviewSizeWidth, 0, 0, PreviewSizeWidth, PreviewSizeHeight);
      MyCameraPreview.setImageBitmap(bitmap);
      bProcessing = false;
    }
  };
}
Step2:Create a JNI cpp file to do the image processing.
/*
*  ImageProcessing.cpp
*/
#include <jni.h>

#include <opencv2/core/core.hpp>
#include <opencv2/imgproc/imgproc_c.h>

using namespace std;
using namespace cv;

Mat * mCanny = NULL;

extern "C"
jboolean
Java_my_project_MyRealTimeImageProcessing_CameraPreview_ImageProcessing(
    JNIEnv* env, jobject thiz,
    jint width, jint height,
    jbyteArray NV21FrameData, jintArray outPixels)
{
  jbyte * pNV21FrameData = env->GetByteArrayElements(NV21FrameData, 0);
  jint * poutPixels = env->GetIntArrayElements(outPixels, 0);

  if ( mCanny == NULL )
  {
    mCanny = new Mat(height, width, CV_8UC1);
  }

  Mat mGray(height, width, CV_8UC1, (unsigned char *)pNV21FrameData);
  Mat mResult(height, width, CV_8UC4, (unsigned char *)poutPixels);
  IplImage srcImg = mGray;
  IplImage CannyImg = *mCanny;
  IplImage ResultImg = mResult;

  cvCanny(&srcImg, &CannyImg, 80, 100, 3);
  cvCvtColor(&CannyImg, &ResultImg, CV_GRAY2BGRA);

  env->ReleaseByteArrayElements(NV21FrameData, pNV21FrameData, 0);
  env->ReleaseIntArrayElements(outPixels, poutPixels, 0);
  return true;
}
Step3:Create a instance in the main class.
public class MyRealTimeImageProcessing extends Activity 
{
  private CameraPreview camPreview;
  private ImageView MyCameraPreview = null;
  private FrameLayout mainLayout;
  private int PreviewSizeWidth = 640;
  private int PreviewSizeHeight= 480;
  
  @Override
  public void onCreate(Bundle savedInstanceState) 
  {
    super.onCreate(savedInstanceState);
    //Set this APK Full screen
    getWindow().setFlags(WindowManager.LayoutParams.FLAG_FULLSCREEN,  
              WindowManager.LayoutParams.FLAG_FULLSCREEN);
    //Set this APK no title
    requestWindowFeature(Window.FEATURE_NO_TITLE);  
    setContentView(R.layout.main);
        
    //
    // Create my camera preview 
    //
    MyCameraPreview = new ImageView(this);

    SurfaceView camView = new SurfaceView(this);
    SurfaceHolder camHolder = camView.getHolder();
    camPreview = new CameraPreview(PreviewSizeWidth, PreviewSizeHeight, MyCameraPreview);
        
    camHolder.addCallback(camPreview);
    camHolder.setType(SurfaceHolder.SURFACE_TYPE_PUSH_BUFFERS);
        
        
    mainLayout = (FrameLayout) findViewById(R.id.frameLayout1);
    mainLayout.addView(camView, new LayoutParams(PreviewSizeWidth, PreviewSizeHeight));
    mainLayout.addView(MyCameraPreview, new LayoutParams(PreviewSizeWidth, PreviewSizeHeight));
  }
  protected void onPause()
  {
    if ( camPreview != null)
      camPreview.onPause();
    super.onPause();
 }
}
Step4:The preview will be the canny image process result.

2012/07/23

How to use Android-OpenCV JNI API

This article shows the steps to build the OpenCV JNI application under the Android.
Before type the copy, we need setup the environment.

Step1: First, we need Android JNI environment, you can refer to articles Install the Cygwin and Install the NDK.

Step2:Then, of course, we need the OpenCV library, you can refer to the article How to use OpenCV under Android to install the OpenCV library. But there is a little difference, is the install directory. The OpenCV library  must installed in the Cygwin directory. In our example, I install the OpenCV library in the I:\Cygwin\JNI\OpenCV-2.4.0


Step3:Create a text file named "includeOpenCV.mk", the file content shows below.
OPENCV_MK_PATH:=../OpenCV-2.4.0/share/OpenCV/OpenCV.mk

Step4:Now, we can start to create the OpenCV-JNI project.
   Open the Eclipse, and load the workspace.

Step5:Eclipse menu bar->File->New->Android Project.The new project directory should be in the same directory as the OpenCV-2.4.0 library.


Step6:Create the JNI and libs directories in the project directory. And setup the auto-compile configuration. Please to refer the article Install the NDK

Step7:Create our JNI c++ code.
 
/*
*  first-opencvjni.cpp
*/
#include 

#include <opencv2/core/core.hpp>
#include <opencv2/imgproc/imgproc_c.h>


using namespace cv;

extern "C"
jboolean
Java_my_project_MyFirstOpenCVJNI_MyFirstOpenCVJNI_CannyJNI( 
  JNIEnv* env, jobject thiz, 
  jint height, jint width, jintArray in, jintArray out)
{
 //get the data pointer.
 jint* _in = env->GetIntArrayElements(in, 0);
    jint* _out = env->GetIntArrayElements(out, 0);


 //Build the Mat structure for input data
 Mat mSrc(height, width, CV_8UC4, (unsigned char *)_in);
 //Build the Mat structure for output data
 Mat mOut(height, width, CV_8UC4, (unsigned char *)_out);

 //Convert Mat to IplImage
 IplImage mSrcImg = mSrc;
 IplImage mOutImg = mOut;

 //Create the gray image for input data.
 IplImage * mSrcGrayImg = cvCreateImage(cvGetSize(&mSrcImg), mSrcImg.depth, 1);
 IplImage * mOutGrayImg = cvCreateImage(cvGetSize(&mSrcImg), mSrcImg.depth, 1);

 //Convert to Gray image
 cvCvtColor(&mSrcImg, mSrcGrayImg, CV_BGR2GRAY);

 //Do canny
 cvCanny(mSrcGrayImg, mOutGrayImg, 80, 100, 3);


 //Convert Gray image to bitmap BGR
 cvCvtColor(mOutGrayImg, &mOutImg, CV_GRAY2BGR);

 //release the pointer. 
    env->ReleaseIntArrayElements(in, _in, 0);
    env->ReleaseIntArrayElements(out, _out, 0);
 return true;
}


Step8:Create the make file for Android JNI and OpenCV.
 
#
#  Android.mk
#

LOCAL_PATH := $(call my-dir)

include $(CLEAR_VARS)

OPENCV_LIB_TYPE:=STATIC
OPENCV_INSTALL_MODULES:=on

include ../includeOpenCV.mk
include $(OPENCV_MK_PATH)

LOCAL_MODULE    := first-opencvjni
LOCAL_SRC_FILES := first-opencvjni.cpp
LOCAL_LDLIBS +=  -llog -ldl

include $(BUILD_SHARED_LIBRARY)


#
#  Application.mk
#

APP_STL := gnustl_static
APP_CPPFLAGS := -frtti -fexceptions
APP_ABI := armeabi-v7a
APP_MODULES := first-opencvjni

Step9:Put the input image to do the canny() processes.In our example is foot.png.


Step10:The entire project files in the Package Explorer.


Step11:When we do the thing right , the libs directory should have the library file "libfirst-opencvjni.so".
Step12:And out APK will be shown in the bin directory.
Step13:Run the APK in the real Phone and result will be this.


2012/07/17

使用Android-OpenCV

這篇文章中提到如建立Android-OpenCV環境.
接下來開始使用Android-OpenCV

1.開啟Eclipse進入Workspace "android-opencv240".
2.進入我們的第一個專案, 開啟MyFirstAndroidOpenCV.java檔案.


3.使用OpenCV的canny()做為範例.
4.先準備原始圖


5.將此檔案放入專案目錄中的3個目錄
   \android-opencv240\MyFirstAndroidOpenCV\res\drawable-hdpi
   \android-opencv240\MyFirstAndroidOpenCV\res\drawable-ldpi
   \android-opencv240\MyFirstAndroidOpenCV\res\drawable-mdpi
  之所以會有3個目錄, 是因為Android會根據手機的螢幕密度(density)來取得圖片,
  如果不在意的話, 3個全放就萬無一失, 想再深入了解可參考此連結.

6.這篇文章主要是簡單介紹如何使用Android-OpenCV, 所以就不處理顯示的部份,
  整個程式流程就是讀檔->Canny()處理->寫檔.

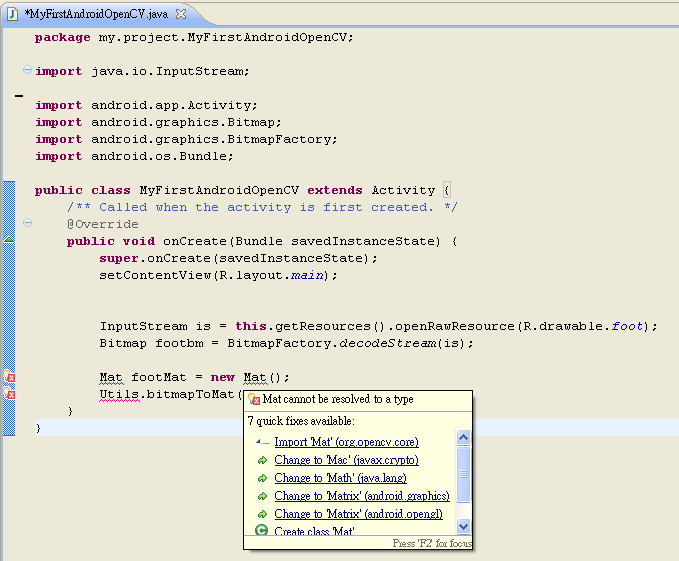
7.遇到Java不認識的類別時, 就手動import.


8.程式碼
package my.project.MyFirstAndroidOpenCV;

import java.io.FileOutputStream;
import java.io.InputStream;

import org.opencv.android.Utils;
import org.opencv.core.Mat;
import org.opencv.imgproc.Imgproc;

import android.app.Activity;
import android.graphics.Bitmap;
import android.graphics.BitmapFactory;
import android.os.Bundle;

public class MyFirstAndroidOpenCV extends Activity 
{
    /** Called when the activity is first created. */
    @Override
    public void onCreate(Bundle savedInstanceState) 
    {
        super.onCreate(savedInstanceState);
        setContentView(R.layout.main);
        
        // read image from resource
        InputStream is = this.getResources().openRawResource(R.drawable.foot);
        Bitmap footbm = BitmapFactory.decodeStream(is);
        
        Mat footMat = new Mat();
        //convert bitmap to opencv Mat 
        Utils.bitmapToMat(footbm, footMat);
        
        //Convert to Gray image
        Mat footGrayMat = new Mat();
        Imgproc.cvtColor(footMat, footGrayMat, Imgproc.COLOR_BGR2GRAY, 1);
        
        //Do canny
        Mat outCannyMat = new Mat();
        Imgproc.Canny(footGrayMat, outCannyMat, 80, 100, 3, false);
 
        //output to file
        OutputGrayMatToFile(outCannyMat, "Canny");
    }
    
private void OutputGrayMatToFile(Mat mGaryMat, String Filename)
{
    Mat mRgba = new Mat();
    Imgproc.cvtColor(mGaryMat, mRgba, Imgproc.COLOR_GRAY2BGRA, 4);
    Bitmap bmp = Bitmap.createBitmap(mRgba.cols(), mRgba.rows(), Bitmap.Config.ARGB_8888);
    Utils.matToBitmap(mRgba, bmp);
  
    try 
    {
       FileOutputStream out = new FileOutputStream("/mnt/sdcard/"+Filename+".png");
        bmp.compress(Bitmap.CompressFormat.PNG, 90, out);  
    } 
    catch (Exception e) 
    {
        e.printStackTrace();
    }
}
    
}

9. 因為有寫檔案到sdcard, 所以需要將此權限開啟, 編輯AndroidManifest.xml


10.產生的檔案會在/mnt/sdcard/canny.png

2012/07/16

在Android下使用OpenCV

1.首先需要有Android SDK開發環境, 此篇文章不說明SDK安裝步驟.
2.下載opencv-android-2.4.0.
3.解壓縮此檔案到目錄"android-opencv240".
解開後有會3個目錄, 其實只需要"OpenCV-2.4.0"目錄,是相關的library部份.
基本上有關android-opencv library的部份已完成.


4.準備進行Eclipse專案設定, 開啟Eclipse, 新增workspace, 選擇上一個步驟中產生的目錄,按下OK.


5.點選進入Workbench.

6.設定Android SDK目錄, Eclipse功能表->Window->Preferences.
第1步先選擇Android SDK 目錄.
第2步按下Apply, 即會跑出Android SDK支援的版本, 我裝了3個版本所以出現了3個.
完成後按下OK,退出即可.


7.開新專案, Eclipse功能表->File->New->Android project
8.填入基本資訊, Project name, Build Target, Properties.完成後按下Finish.


9.回到eclipse主畫面, 會出現新專案.


在OpenCV目錄中會出現專案目錄, 此專案的原始碼與產生的APK皆是在此產生.


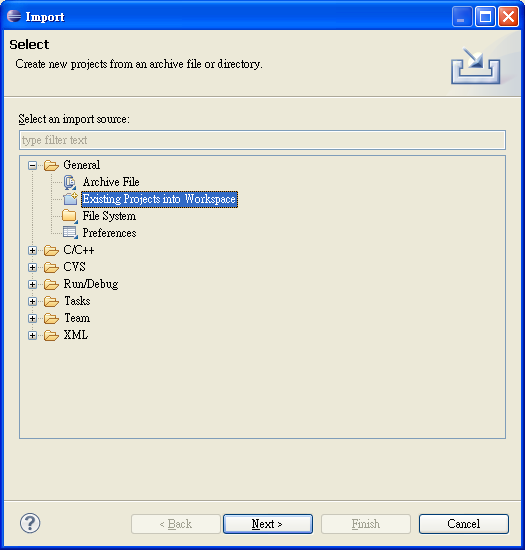
10.將OpenCV library匯入, Eclispe功能表->File->Import.


11.選擇General->Existing Projects into Workspace.


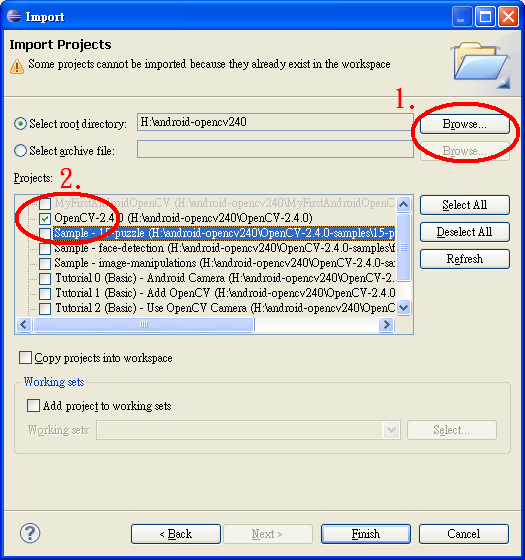
12.選擇OpenCV library目錄, 並選擇要匯入的專案, 基本可以只匯入OpenCV-2.4.0即可, 其他的是範例目錄, 匯入也無仿, 但是每次進入workspace會比較慢.


13.回到Eclipse主畫面, 會出現OpenCV-2.4.0.專案.


此時會出現錯誤訊息, Project has no default.properties file! Edit the project properties to set one.
解決方法:可將我們之前產生的MyFirstAndroidOpenCV專案目錄中的default.properties檔案, 複製到OpenCV-2.4.0目錄中, 再重新啟動Eclipse, 並進入此Workspace.

14. 重啟進入後, 會再出現另一個錯誤訊息,
      Android requires compiler compliance level 5.0. Please fix project properties.
 
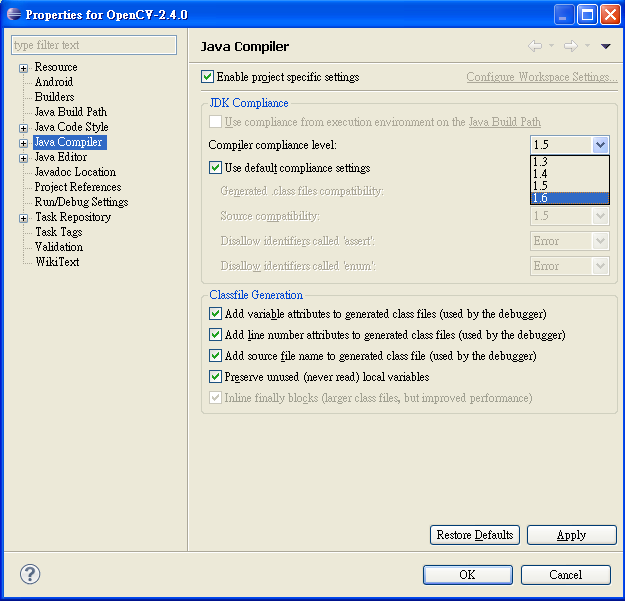
15.在Opencv-2.4.0專案名稱上按下滑鼠右鍵,點選Properties進入設定.
     選擇Java Compiler, 在JDK Compiler中設定Compiler compliance level:為1.6
     按下Apply, 會自動重新Compile, 按下OK 離開, 回到主畫面後, 錯誤訊息已消失.


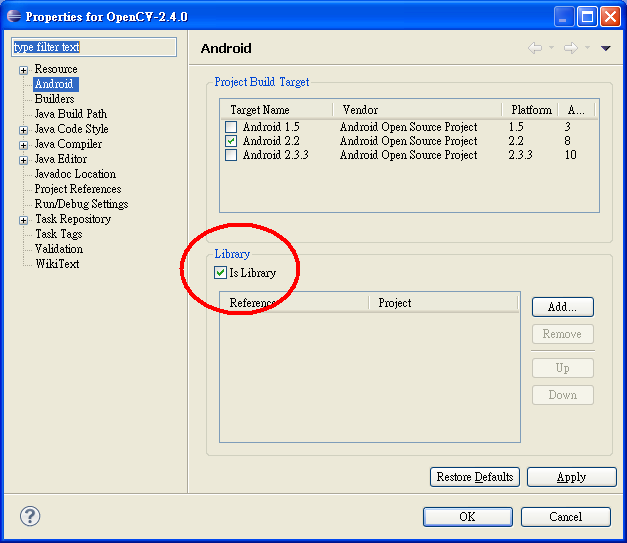
16.還需要將此OpenCV-2.4.0設定為library, 才可以被其他專案使用.
     在Opencv-2.4.0專案名稱上按下滑鼠右鍵,點選Properties進入設定.
     選擇Android, 並勾選library.


17.到目前為止, 已成功將我們的專案產生, 並匯入OpenCV library, 但是還不能使用OpenCV, 還                    
需要再設定library.

18.在MyFirstAndroidOpenCV專案名稱上按下滑鼠右鍵,點選Properties進入設定.
     選擇Android, 並點選Add按鍵進入.


19.選擇OpenCV-2.4.0,按下OK.


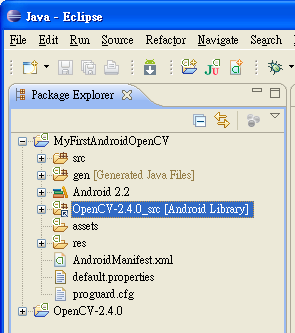
20.成功選擇後, 會出現OpenCV-2.4.0 library.點選OK離開.


21.回到Eclipse後, 我們的專案已將Opencv-2.4.0匯入成library了.Oh Yeah!


22.終於可以辦正事了! 這篇有點長了, 請看下一篇,教你如何使用Android-OpenCV.