Before type the copy, we need setup the environment.
Step1: First, we need Android JNI environment, you can refer to articles Install the Cygwin and Install the NDK.
Step2:Then, of course, we need the OpenCV library, you can refer to the article How to use OpenCV under Android to install the OpenCV library. But there is a little difference, is the install directory. The OpenCV library must installed in the Cygwin directory. In our example, I install the OpenCV library in the I:\Cygwin\JNI\OpenCV-2.4.0
Step3:Create a text file named "includeOpenCV.mk", the file content shows below.
OPENCV_MK_PATH:=../OpenCV-2.4.0/share/OpenCV/OpenCV.mk
Step4:Now, we can start to create the OpenCV-JNI project.
Open the Eclipse, and load the workspace.
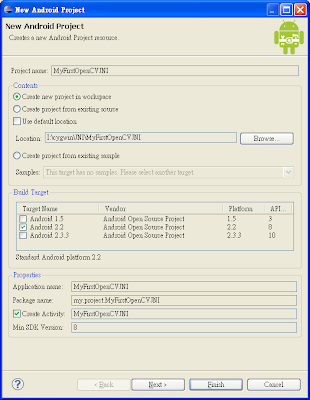
Step5:Eclipse menu bar->File->New->Android Project.The new project directory should be in the same directory as the OpenCV-2.4.0 library.
Step6:Create the JNI and libs directories in the project directory. And setup the auto-compile configuration. Please to refer the article Install the NDK
Step7:Create our JNI c++ code.
/* * first-opencvjni.cpp */ #include#include <opencv2/core/core.hpp> #include <opencv2/imgproc/imgproc_c.h> using namespace cv; extern "C" jboolean Java_my_project_MyFirstOpenCVJNI_MyFirstOpenCVJNI_CannyJNI( JNIEnv* env, jobject thiz, jint height, jint width, jintArray in, jintArray out) { //get the data pointer. jint* _in = env->GetIntArrayElements(in, 0); jint* _out = env->GetIntArrayElements(out, 0); //Build the Mat structure for input data Mat mSrc(height, width, CV_8UC4, (unsigned char *)_in); //Build the Mat structure for output data Mat mOut(height, width, CV_8UC4, (unsigned char *)_out); //Convert Mat to IplImage IplImage mSrcImg = mSrc; IplImage mOutImg = mOut; //Create the gray image for input data. IplImage * mSrcGrayImg = cvCreateImage(cvGetSize(&mSrcImg), mSrcImg.depth, 1); IplImage * mOutGrayImg = cvCreateImage(cvGetSize(&mSrcImg), mSrcImg.depth, 1); //Convert to Gray image cvCvtColor(&mSrcImg, mSrcGrayImg, CV_BGR2GRAY); //Do canny cvCanny(mSrcGrayImg, mOutGrayImg, 80, 100, 3); //Convert Gray image to bitmap BGR cvCvtColor(mOutGrayImg, &mOutImg, CV_GRAY2BGR); //release the pointer. env->ReleaseIntArrayElements(in, _in, 0); env->ReleaseIntArrayElements(out, _out, 0); return true; }
Step8:Create the make file for Android JNI and OpenCV.
#
#  Android.mk
#

LOCAL_PATH := $(call my-dir)

include $(CLEAR_VARS)

OPENCV_LIB_TYPE:=STATIC
OPENCV_INSTALL_MODULES:=on

include ../includeOpenCV.mk
include $(OPENCV_MK_PATH)

LOCAL_MODULE    := first-opencvjni
LOCAL_SRC_FILES := first-opencvjni.cpp
LOCAL_LDLIBS +=  -llog -ldl

include $(BUILD_SHARED_LIBRARY)
#
#  Application.mk
#

APP_STL := gnustl_static
APP_CPPFLAGS := -frtti -fexceptions
APP_ABI := armeabi-v7a
APP_MODULES := first-opencvjni
Step9:Put the input image to do the canny() processes.In our example is foot.png.
Step10:The entire project files in the Package Explorer.
Step11:When we do the thing right , the libs directory should have the library file "libfirst-opencvjni.so".
Step12:And out APK will be shown in the bin directory.
Step13:Run the APK in the real Phone and result will be this.


Could you please upload the MyFirstOpenCVJNI.java
ReplyDeleteBitmapFactory.decodeStream is returning null
Do you mean read the image failed?
ReplyDelete// read image from resource
InputStream is = this.getResources().openRawResource(R.drawable.foot);
Bitmap footbm = BitmapFactory.decodeStream(is);
The foot.png must put in the res directory of the project, for example.
\android-opencv240\MyFirstAndroidOpenCV\res\drawable-hdpi
\android-opencv240\MyFirstAndroidOpenCV\res\drawable-ldpi
\android-opencv240\MyFirstAndroidOpenCV\res\drawable-mdpi
How to pass the image from the java class to the native .cpp function. Is it in int, mat or bitmap?
DeleteI am new to jni application in android.
If you could upload the MyFirstOpenCVJNI.java it would be easier for me to have an example.
Thank U so much for Ur rpl...
Hi Neel:
DeleteI submit the project to GitHub.
https://github.com/ikkiChung/MyFirstOpenCVJNI
Thank U so much
DeleteHello,
ReplyDeleteThanks for your post.
I've tested this example of project and the result isn't expected result, when i run the APK in my real phone, the display shows the sentence: Hello World,MyFirstOpenCVJNI!
I've put foot.png in the res directory.
Thanks!
Ok, i've realized that the resultant image is saved in my external card.
DeleteI believed the image will be shown in the display.
Sorry!
Yes, it will be in the directory. I'm glad you do it successfully.
DeleteThis comment has been removed by the author.
ReplyDeleteThis comment has been removed by the author.
ReplyDeletecan you please tell me how to Find out the Result image? Thanks!
ReplyDeleteThe result image should be in the ExternalStorageDirectory, but each Android device may define the directory in their way.
DeleteSo i recommend you should log the extStorageDirectory to show exactly path in your device.
source code:
String extStorageDirectory = Environment.getExternalStorageDirectory().toString();
String outFileName = extStorageDirectory + "/outCanny.png";